


1987-1989 Z31 Instrument Cluster Upgrade (Lighting and Needles)
My cluster was dim, and since I work with LEDs and fiber optic lasers for a living, I decided to update it: LED bulbs for more brightness, white reflectors to spread the light, and red needles that are easier to see at night.
This guide covers the 1987-1989 analog cluster. Leave time for the paint to dry.
Before and After


Parts and Tools
LED bulbs
- 3 × mini SMT LED to replace the #158 (a #194-style LED also fits), amber
- 1 × LED to replace the #2722 T1.5 (a #74-style LED also fits), amber
- 6 × T1.5 / neo wedge / 12mm base LED, red (Autolumination sells these)
Paint
- Testors Model Master Flat White, FS37875 (reflectors)
- Testors Model Master Fluorescent Red, FS28915 (needles)
- Testors Model Master Insignia Red, FS31136 (needles)
Tools
- Phillips and flat-head screwdrivers
- Ratchet and assorted sockets
- A small paintbrush
Cluster Bulb Chart
| Nissan part number | Common number | Volts / watts | Type | Qty |
|---|---|---|---|---|
| (24855C) 24860-21P01 | 158 | 12V / 3.4W | T3-1/4 | 3 |
| (24855C) 24860-21P02 | 2722 | 12V / 2.0W | T1.5 | 1 |
| (24855B) 24860-21P00 | 39320 | 12V / 2.0W | T1.5 / neo wedge / 12mm base | 6 |
A #194 can replace the #158, and a #74 can replace the #2722.
1. Remove the Cluster
- Remove the lower steering column trim (three Phillips screws).
- Remove the plastic shroud behind the steering wheel: two screws per side, then lift off the top half.
- Remove the switch pods on each side of the cluster. See Replacing your switch pod bulbs.
- Loosen, but don't remove, the two gold bolts under the steering column so the column drops. This gives you room to get the cluster out without pulling the steering wheel.
- Remove the two Phillips screws holding the cluster bezel, then carefully lift the bezel out.
- Remove the Phillips screw on each side of the cluster.
- Pull the cluster forward slowly, press the top and bottom tabs on each connector to unplug it, and ease the cluster out between the steering wheel and the dash.


2. Open the Cluster
- Remove the gauge face lighting bar on top of the cluster (three small Phillips screws), plus the two auxiliary bulbs.
- Carefully remove the three circuit boards: the lighting bar and the two auxiliary bulb boards.
- Remove the front lighting bar to expose the white light diffusers.
- Remove the clear acrylic cover: four screws in front and five in back, then release the four rear and two front tabs and lift the cover off.


3. Paint the Reflectors
A regular bulb shines in every direction, but an LED aims its light forward in a narrow beam, red ones especially. Painting the surfaces around the bulbs white bounces that light back onto the gauges and needles.
- Stir the flat white enamel well.
- Paint the underside of the front lighting bar, and the spots on the circuit board around the temperature and fuel gauge bulbs.
- Paint the inside of the trough the bulbs sit in. Give it several coats; this makes the biggest difference to how well the red LEDs light the needles.
- Let everything dry fully before reassembly.


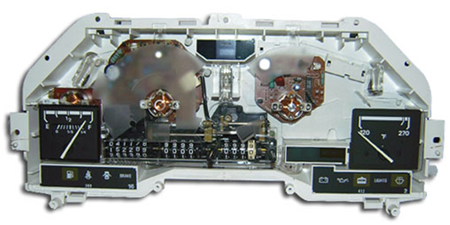
4. Where the Bulbs Go
The cluster spreads its light with an acrylic diffuser. The gauge face is orange Lexan, screen printed, with white dots on the back to even out the light, and two windows for the temperature and fuel gauges.


5. Paint the Needles Red
The Z31 needles are plastic with a small counterweight. Fluorescent red alone comes out orange-red and glows under black light; blending in some insignia red gives a deeper red that matches the tachometer.
- Remove the needles.
- Mix the fluorescent red with a little insignia red.
- Paint the needles and let them dry.
- Reinstall the needles at their original rest positions.
The red shows by day, under the LEDs at night, and glows under black light.


6. Reassemble and Test
- Clean the inside of the acrylic cover and reassemble the cluster, leaving the screws snug but not fully tight.
- Slide the cluster in and plug in the connectors, including the illumination connector behind the tach.
- Turn on the parking lights and check every LED. LEDs only work one way round, so flip any that stay dark.
- Check that all the gauges work, then tighten every screw and reinstall the trim, switch pods and column bolts.
The result: brighter, cooler-running, longer-lasting lighting, and red needles and gauges that are easy to read at night. Add a UV bulb if you want the fluorescent glow too.
Credits
- Write-up: Nivo88T
- 1984-1989 Nissan 300ZX factory service manuals